Saturday, November 11, 2017

In Retrospect: Voodoo Cheval (Part 2)


The previous post left off with the re-introduction of snakes in Wave 6 of level one, so we'll pick up from there.

Wave 6


The snakes are significantly faster than zombies, and paired with their capability to split in two should the player make a wrong move, they prove to be a significant challenge when tossed into the spawn wave mix.  

Up until this point, the player has been able to get by with just drawing circles of various sizes on the screen, fighting off larger and larger hordes of zombies.  With the addition of snakes, I wanted to keep a similar pace to what has been developed so far without having to place a large emphasis on a new enemy type, hence why two snakes were placed in this wave, along with 4 zombies.  

As snakes appear first on the screen, it gives the player a moment or two to process what they are seeing and try to recall where they had seen it before.  This was, in hindsight, the wrong way to go about it.  Snakes should have been a part of the mix from the beginning, considering we introduce them so early on in the experience.  This could have even further prevented the use of the exploit (discussed in the last post) from the beginning, keeping it from even being called an "exploit" in the first place.

Thankfully, if they fail to react and kill the snakes in time, we have placed a check point here to avoid the frustration of starting over at Wave 1.

Wave 7


A bit of a throwback to the lesson I was aiming to teach in Wave 2, with the single, large grouping of zombies.  This wave, an arrangement of 8 snakes that were split into 2 straight lines, were meant to suggest visually that the player could chain together multiple snake kills with a single drawn line.  Two lines of snakes were used instead of one to, again, avoid slowing down the pace too much when introducing a (possibly) new idea.

Waves 8-10

More practice in iteration, applying concepts I attempted to develop since Wave 1.  Overall, I'm pretty happy with the way these placements turned out, they strike an odd balance between symmetrical and random.  Enemies are, for the most part, consistently pouring in from every direction into the screen, without favoring a particular side.  This keeps the player actively analyzing the entire scene, making quick decisions as to which enemy to take out first.


Wave 11


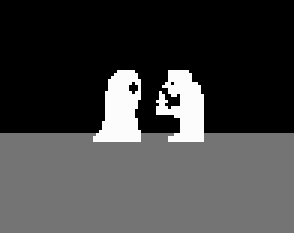
The last enemy that gets introduced in Level 1, the "Demon".  The demon comprised of 3 possesed skulls, all chained together by magic.  The idea was that to defeat the skulls, you would have to trace the chain that connected them.  Sometimes, this suggestion would be a little more vague than others (see above screenshot). 

This was a bit of an odd one to work with, as his prefab asset was designed to randomly place him on the map, with the skulls placed in a somewhat random arrangement up to a certain distance from one another.  Originally, we had aimed to have 10 waves in total for Level 1, but somewhere during development of the other levels, it was decided that the demon should be introduced earlier in the game.  I don't recall if we even had discussions of offering the demon a tutorial like we did the zombie and the demon...  But I liked the idea of giving him his own wave, and letting the player figure out how to defeat him.  The chains, being connected in straight lines, should have (hopefully) suggested what action to take.

Waves 12-15

The last set of iterative levels.  Now that I have played through the whole game a few times, these last few felt anti-climactic... I'm unsure as to why this ended up being the case, but the only thing that I can recall was worrying about the integration of the random demon spawn with the rest of the enemy placements.  Placing that asset required thought and timing in relation to when the other enemies would appear on screen; I didn't want to run into the situation where the player was unfairly overwhelmed.


I am pleased to see that, for the most part, I remained consistent in applying the concepts from earlier parts of the level (varying sizes of zombie hordes, grouping of snake-lines), as it certainly added variety to my input actions.  The game never quite felt stagnant, the only change between waves that I could feel upon re-playing the game was a rise and fall in flow .


Conclusion

"Voodoo Cheval" has it's flaws, but as "my first shipped title", and my time working with a large team on one project, I enjoyed the experience and am rather proud of the final result.  Joining VGDA made me a few friends, but I also got the opportunity to learn a lot of development practices and concepts first hand.  These lessons may seem obvious to you as a seasoned developer; they're obvious to me now even with only a year or two of experience under my belt.  But these lessons were important nonetheless, and sometimes the only way you will learn them is the hard way:
  • Play-test early, play-test often, play-test with everyone.
    • It's obviously important to play test your game frequently and thoroughly, but it's also important to try to play with a mindset of someone who has never seen your game before.  This is the job of the average QA tester, someone who will dive into a game and try to break all of the rules; accounting for every possible thing that could go wrong or could be done differently than what the designer anticipates (see 'The Exploit' in part 1).  This could yield better results in the long run when you take your game to external play-testing.
    • Play-testing the whole game (or level, in my case) sounds exhausting, and I'm pretty certain I had my aversions to the idea during development (even though my part of the game lasted only 5 or 7 minutes...).  But it's truly the only way to really gauge the difficulty curve of the experience as a whole.
  • Look outward for inspiration.
    • Something I realized looking back at this development process was that I never ventured outside of Voodoo's bubble to gather inspiration on how to approach the spawn-wave design.  I would often try to sketch waves on paper and try to determine the best way to use the pieces at hand, or simply drop assets into Unity and adjust their locations until I had a wave that simply "felt good".  Now that I have a few other projects under-way, I am constantly doing research and looking for inspiration to better the game-play experience overall.  I can't help but wonder how different this level could have been if I had put that into practice earlier.
  • Open and constant communication.
    • This wasn't a lesson so much learned as much as emphasized.  As a college student, working on a game part-time with a club, your priorities shift often.  Class work builds up, exams get brutal, and tasks that you either aren't payed for or graded on will get pushed aside.  Communication in this kind of situation is huge if a project is going to see completion by a deadline, as assigned tasks that you might not be able to complete can be handed off to someone else.  As VGDA did it's best to mimic an Agile environment, there were several techniques and tools that I had to become familiar with, like Trello or weekly Scrums, that assisted in keeping communication open and updates constant.
Overall, as small of a game as Voodoo Cheval is, my time developing it was worthwhile.  I've since continued working with VGDA on our next title, and I can't wait to see what challenges we overcome together.

Friday, November 10, 2017

In Retrospect: Voodoo Cheval (Part 1)

During a QA session with some of the recruiters at Blizzard, it was brought to my attention the importance of maintaining documentation for your design and development process.  While I reviewed the documents I had made for previous projects, I had the idea of making a collection of blog posts that review particular challenges or struggles that I encountered and what my solutions to them would be.  Looking back at my experience in this way, I hope, will help to shed some light on things that may have gone right, as well as things that I could have done differently.  Consider these posts to be bite-size post-mortems.


Voodoo Cheval is the first (and at the time of writing, the only) game that I have worked on that has been published onto a distribution platform.  If you are unfamiliar with the title, it is an action game intended for mobile devices, where the player is tasked with defending their beloved horse from an onslaught of zombies, snakes, and other monsters by drawing particular shapes on the screen to destroy them. 

I was brought onto the project rather early in development, signing up for a role that sat between design and programming, but leaning more towards the design end of things.  The team, like myself, were all full-time and part-time students of California State University, Long Beach, who had banded together to form the Video Game Development Association (or VGDA, as I will refer to it from now on).  What I found so brilliant about this opportunity was that very fact; we were all students.  We all had coursework to worry about, jobs to help pay for rent and tuition, very little free time, and a huge passion for video games.

The team was fairly large in scale, and with each of us only being able to contribute so much time each week to development, tasks were divided into smaller, more manageable pieces.  While I had the opportunity to work with other students designing systems, namely enemy behavior and player controls, the bulk of my work was in designing Level 1; an open setting where 3 types of enemies would appear on the screen in waves.  By the end of development, there were 15 waves in total, each with it's own purposeful design with the aim losing the player within "the magic circle".


Tutorial

Upon starting the game from the main menu, the player is met with a very brief and simplistic "scripted tutorial" scene, where the player is met 2 types of enemies that they will see throughout the remainder of the game.


Although this tutorial was not of my own design (will give credit when I find out who exactly built it), it had a large influence over how I built the rest of the introductory stages.  The goal was to make the tutorial completely interactive, without hindering the start of a play session too much.  As the enemies approach the horse on screen, the player will have the opportunity to defeat these enemies in the usual fashion, but if they do not know what to do, the snake and the zombie will pause, staying frozen in place before they can cause any harm.  When they freeze, the spell effect (usually visible on the screen when touch input is detected) is animated to suggest what action to take, almost in a "monkey-see monkey-do" kind of way.

No pop-up windows, no invasive companions to say "Hey! Check this out!".  Just a simple suggestive animation paired with a brief safety buffer before the game really begins.  For a new player, this brief encounter establishes the foothold that the following enemy spawn waves will build upon.

Wave 1


Looking back on it, I'm pretty sure I over-thought some of these enemy placements...  It was clarified before I started that enemy spawn would not be random, but placed.  With replay-ability being a concern, I felt it best to keep these placements a little on the unpredictable side.  Hence, this asymmetrical placement of the first two zombies.  An easy win, but it also should have served as an indicator that, from this point forward, there will never be just one of these guys on the screen at a time.

Wave 2


The idea behind this wave was to re-enforce an idea that might not have been obvious to every player: the fact that you can kill more than one enemy with the same attack.  Even if you attempted to draw a circle around a single zombie in this grouping, you are bound to rope in another one with how close together they are.  This was also meant to establish the idea that the size of the shapes you will draw can vary, which we will find out later can either help or harm you immensely.

Waves 3, 4, and 5


The third wave was intended to push the player to use the different sizes of circles that were demonstrated between waves 1 and 2.  The zombies on the left and right are the first to appear, and they are spaced relatively far apart.  It would be fairly easy to circle each one individually or circle them both together.  The grouping at the top of the screen comes shortly after, a little more tightly knit together, and finally there's the big grouping at the bottom, appearing slightly behind the grouping at the top.  

At this point, the player may start to feel a little frantic, drawing circles around zombies the second they pop onto the screen.  But if they are patient, they may be able to see that by allowing the zombies to draw in closer, they can draw one big circle to take them all out at once.

Unfortunately, we never implemented any sort of reward system for combo kills.  Something that would have made this design process a little more meaningful.

Wave 4, shown below, tries to make that idea of the risk and reward of patience a little more obvious, having the zombies enter the screen in the form of an actual circle.


In hindsight, it might have made more sense to swap Waves 3 and 4 to make this point, but I think it also works in regards to replay-ability.  Now that you are fully aware of how this kind of strategy could pay off, you might want to play through it again and see how many zombies you could kill with a single drawn circle.  An unexpected issue that this design may have contributed to, however, is the discovery of an exploit that many players would try to abuse,which I will discuss shortly.

Wave 5 was simply a zombie rush, with assets placed in various positions in an attempt to establish rhythm, but while avoiding predictability.  Designing waves like this one (there are many others in Level 1) was simply an iterative process, where I would place the zombies in various positions and re-position them until the wave felt like it could hold a "flow"; not too challenging, but not to boring either.


The Exploit

Something that become apparent to us rather quickly during play testing was the fact that the player could, in fact, draw circles big enough to wrap around the whole screen, if they were quick enough to make the  beginning and ending points of the line connect.  I don't quite recall at what point or which wave that play-testers would come to this realization, but I'm pretty sure it was around waves 3 or 4.

When a discovery like this one is made this early on, it makes the "strategic placement" of enemies essentially moot.  Even more unfortunate, the team never got around to properly addressing and fixing the issue.
A (rather poor) demonstration of the exploit being used in Wave 3.

Looking back, there are a few reasons I can think of as to why this wasn't fixed.  One is the deadline; as students, the goal was to make one small game over the course of a semester, all the way up to the week of final exams.  While we did do a fair amount of internal play-testing, this issue wasn't really brought to our attention until we had students from other colleges play the game at the Student Game Developers Alliance Summit in May, not long before our deadline.  At this point in time, we were no doubt scrambling to get bugs fixed and the final art assets in place, which ultimately still resulted in a cohesive experience we were all proud of by the end of development.

Another reason that comes to mind is how ineffective this strategy becomes after Wave 5, as snakes are re-introduced for the first time since the tutorial.

Something that might not have been made clear in the tutorial is this particular trait about snakes:  if you accidentally draw a circle around them, they "split", and form two smaller snakes that the player now has to deal with.  If the player were to simply sit there and spam large circles on the screen, without paying attention, they would be overrun within moments.


I recall at the time feeling that this enemy design would counteract the exploit so easily that it would be abandoned after Wave 6, which could also be how the rest of the team felt when the exploit was discovered.  In either case, it taught me to try to play-test my own work from a perspective of someone who doesn't know what to expect.  This seems so obvious to me now, after reading books and articles on bug testing or human centered design, but as this was one of my earliest projects, I'm willing to forgive myself and move on.

Thursday, September 28, 2017

Star Fox 2 Reviews - A Question of Context?

The Super Nintendo was a console I skipped as a child, much to my dismay.  My older brother had the N.E.S., where I would be allowed to play Super Mario Bros, Duck Hunt, or Rush'n Attack (my favorites, from what I can remember) for upwards of 20 minutes a day while I was in grade school.  That system was all I needed, and at that age, I had no real concept or interest in the game industry at large.  Ignorance was bliss.

Some years down the line, my brother received the Nintendo 64 as a Christmas gift; the console that would define my childhood.  I had dumped numerous hours into Super Mario 64, Banjo Kazooie, and Pokemon Stadium (having been permitted more than my 20 min allowance by this time).  But one game that my friends and I would constantly play and discuss at the schoolyard was Star Fox 64.  We were not only amazed by the diversity of it's levels and the numerous pathways you could take to the end of the game, but the 3D graphics and effects in play at any given moment made you feel as if you were a part of some big-budget, sci-fi action movie.


That was back in '97 or '98.


I can still play these games today and have an enjoyable experience.  You could pin it down good design or just nostalgia, but it is very rare that I pick up and replay a game for it's graphic fidelity.  It's more common to hear the phrase "these graphics haven't aged well..."

The thing is, these games pushed limits that are simply irrelevant today.  Computing has leapfrogged into an age where photo-realism in a virtual environment is not unheard of.  This, of course, has had an incredible influence over the manner in which games are critiqued in this day and age.  Games are rated typically based upon what other options are available in the market place at the time of release.

This lead me to asking the question:  "Can we even justify rating Star Fox 2?"

Star Fox 2 was, as you might guess, the sequel to Star Fox, originally released on the Super Nintendo.  It was cancelled due to the imminent release of the Nintendo 64 in 1996, a console whose aim was to completely re-invent the way 3D graphics are handled in video games.   Having such a grand appreciation for the impact Star Fox 64 had on my childhood, I was of course surprised and excited to hear the news SF2 would see an official release, as a game included with the SNES Classic Mini.  As I understand it, the developers themselves shared this surprise and excitement even more-so.

Courtesy of  Hidetaka "Swery" Suehiro's twitter.
The original installment of the series utilized the processing power of the SNES to create 3D effects that stunned gamers and critics alike.  The "Electronic Games" magazine had this to say about these visual aesthetics back in 1993:

"The SFX chip is the heart and souls of this great new shooter.  Designed in England by Argonaut Software, the chip manages to accelerate polygon graphics to the point of smooth animation.  Without the help of this special chip built into the cartridge, the Super Nintendo would not be able to independently create the eye-popping visuals in StarFox."
It is worth noting that at the time of release, StarFox received a rating of 95% from this publication.

This is the kind of vocabulary we see with every new generation of gaming.  It's very rare to see gaming journalists look back at the previous generations of consoles and re-evaluate their use of the platform, because for the most part, the games of the past are irrelevant.  You're comparing apples to oranges.  So why has this changed with regards to Star Fox 2?  Why are we seeing modern-day reviews for a game that was intended for a console produced 27 years ago?

For the most part, it could simply be due to the fact that Nintendo themselves has decided to publish it.  Recently, there has been a movement to preserve electronic games and their assets by dedicated fans and historians.  Every so often, prototypes for unreleased games will surface, like the Nintendo 64 version of "40 Winks", and it raises discussion.  Not so much regarding the quality of the game, but more to the circumstances surrounding it's cancellation.  Releasing a previously cancelled game could almost be compared to the uncovering of such a prototype, but as Nintendo sought to ensure the game was in a completed and playable state, and included it in the highly demanded SNES Mini Classic, some are treating it as an official release like every other game.

While I find this reasoning to be completely justified, the mentality of which the game is critiqued should be adjusted to fit the context.  At the time of writing this post, there are few reviews published for SF2, but the review from IGN is glaring me in the face with every google search.

"totally 90s moments"

The reviewer's argument here is primarily based upon SF2's "primitive 3D" graphics, which are described as "jarringly bad".

"But if you can stomach the terrible frame rate, it is playable – enough that I could beat it on Hard. Sometimes, it’s even enjoyable."
Oof, hitting the frame-rate.  A sore spot for all modern gamers.

This sort of argument, if you take gaming history into consideration, is not one that should really even be made.  The original Star Fox, from my limited research (forum users on various retro-gaming/homebrew sites), ran at approximately 19 frames per second, where as most Nintendo 64 games would still run below today's standard of 30, hovering closer to 20 frames per second.  Unfortunately (or fortunately, depending on your stance on emulation), Nintendo emulates games on the SNES Mini with a focus on accuracy rather than performance (according to reviewers), so the argument still stands that criticism should be approached with dated processing power in mind.

Thankfully, the second half of the review does spend some quality time discussing the systems design of the game.  Star Fox 2 adds the capability of the player to choose a second wing-man, each with their own special abilities, to accompany you through each stage, serving as a second life should you get shot down.  The sequel also introduces a "real-time strategy-like frame" that "puts pressure on you at every moment."  From a game-play standpoint, it sounds like a lot of fun.

The point being, though, is the idea of reviewing a game like this is almost unfair.  Star Fox 2 is a game out of it's time, one that might have been considered a gem of the SNES generation had it released back then.  It's quite a blessing that the game was able to see the light of day at all, and that we can still experience something new on a console that many gamers hold dear.  Just don't expect it to be the action-packed visual feast that you might have experienced you were younger.

Sunday, September 17, 2017

Essay: World Building in Video Games


In an attempt to better my writing skills, I've written another essay, a bit longer than my previous work.  This one takes a brief look at the practice of "world building", and how complete immersion into a fantastical universe can be accomplished through the interactive design of video games.  As always, feedback is encouraged.  

Below is an excerpt from the opening paragraphs:

"If you are already well versed in works based in science fiction or fantasy, you may already have a good understanding of the practice of world building.  However, for the sake of clarity, allow me to do a brief recap of some of the basics. A quick google search for "world building definition" offers some very straight-forward results: "World-building is the process of constructing a fictional universe."[1], "The process of constructing an imaginary world."[2], or "The process of creating worlds for use in a fictional tale."[3]. World-building means building worlds. I'm glad we got that sorted out.

What if we broke down this term a little more? The definition of "building" seems a little obvious here, yet looking up the term "world" in the Merriam-Webster Dictionary provides an interesting variety of definitions, one of the more notable of these being "the system of created things"[4]. Given some thought, this seemingly vague and broad definition may actually make the most sense, as the world we live in is more than just the people we meet and the ground under our feet. We have sets of laws (physics, nature, gravity, etc.) that keep the world turning. Most everything has some underlying logic that doesn't quite make sense until it is placed with context. The earth has a rich, diverse history of it's own that can seem almost unreal when considered today; Try to imagine dinosaurs roaming the outskirts of Columbus, Ohio[5], or California at the bottom of the ocean[6].


The history of the earth, paired with these "systems" that are in place, sets the stage for each and every one of our modern-day adventures. We aren't necessarily aware of these systems at all times, but they guide each and every one of our actions. Therefore, it makes absolute sense that artists, writers, directors, and game developers would go to great lengths to create a detailed world outside of our own, with its own rules and history, to better immerse the audience into their stories; a "second world". But just how exactly is this accomplished?"

Wednesday, May 17, 2017

Essay: A Study of Spaces in Yooka-Laylee


I've written a small essay analyzing the spaces and level design of Yooka-Laylee.  I have anticipated this game since it's Kickstarter announcement, and felt that this is a good opportunity to practice writing about some concepts of design that I have been studying about lately.  I'm looking to grow in my wiritng ability, so as usual, feedback is encouraged.

Below is an excerpt from the opening paragraphs:

"Yooka-Laylee, and other games that fall under the Free-Range Platforming genre, appeal to gamers who like to explore, discover, and interact within an interesting 3D space.  While the game mechanics are important to the impression the player has over their experience, creating a space that places the player in a state of flow is just as important, if not more-so.  Everything down to the tactile interaction the player has with the objects placed around them assists in creating a memorable and enjoyable experience.  It is in the expansion of these virtual spaces that we often see a change between generations of gaming, as an increase in memory and processing power allows for bigger and more interactive worlds to explore.  To create a world that in non-linear, but also naturally guides and encourages the player to take specific actions is a challenge indeed, and I hope to get a firm grasp on how 3D level design should be done for my own work in the future."


Wednesday, April 19, 2017

"Free-Range" Platforming

Alternatively Titled: "Don't get caught up in terminology like I do."

While I was researching for my previous post, I found myself getting caught up in labels.  It turns out that the name "3D Platformer" can go a long way, and I was constantly finding myself reading too much into games that were not really similar to the type of experience I was searching for.  As an obvious example, Wikipedia gave me Crash Bandicoot when I wanted Donkey Kong 64.

This led me to searching for games that bore the other relevant title of "Collectathon".  However, it turns out that I would face a similar issue.  While games like Banjo-Kazooie and Super Mario 64 wear this label with pride (collecting being the goal of the game), there are others that also bear the title that are not quite in the same vein of gameplay.  Titles like Rayman Legends, while incredible games that highlight collecting as a motivation, are still linear experiences in comparison the the exploratory nature of the N64 Rare games.

I'm hereby proposing a name change for the games that followed the 3D Platforming Collectathon model of Super Mario 64:


"Free-Range Platformers"


The term "free range" refers to a style of husbandry that has livestock (usually associated with chickens) roaming freely in an enclosed area outdoors, rather than being cooped up all day.  I found myself relating to these games in this manner; typically, each game will have a hub world that the players will have to return to after spending some time exploring a stage.  Try to imagine those free-range chickens collecting all of those seeds and insects, only to exchange them for a more prime location in the chicken coop when they return at the end of the day.

Granted, this label may suggest that the player is some kind of a farm animal, but I stand by it.  In fact, I think I'll use this term in my future posts until at least ONE other person picks it up.

P.S. - More in-depth analysis on free-range platformers coming soon.

Saturday, April 15, 2017

Essay: The Evolution of the 3D Collect-athon (and Where it Stands Today)


I've written my first major essay on game design, looking at the evolution of a genre that I've held very dear since my childhood in anticipation of Yooka-Laylee's release.  This is my first time writing something of this length on the subject, so feedback and constructive criticism is appreciated.

Below is an excerpt from the introductory paragraphs:

"Many reviews have praised the game as a proper "return to form", being a true spiritual-successor to Banjo-Kazooie.  Others have found the game to be far too dated, stating that the game carried issues back from the N64 era.  I have often considered Banjo-Kazooie to be one of my favorite games of all time; it is the game that got me into games in the first place.  So I had to ask myself: Is there really any room for the original 3D Platformer/Collect-athon style in this day and age?  Could a game like Yooka-Laylee offer more than just a nostalgia trip?"

Thursday, January 19, 2017

NESDev - End of Semester Sprint (Pt. 2)

I just wrapped up my last blog post, which covered some programming concepts for the game.  As I had little time, I had to eventually settle on a stopping point and move on to the hardware implementation of this project, lest I risk getting a low grade.

Cartridge Overview


There are a few ways I could have approached the porting process.  The one I chose is a fairly common practice among developers, in which they purchase a "donor cartridge" and use an EPROM programmer to write their own code onto chips.  The original ROM chips would be desoldered and replaced with the new EPROMS/EEPROMS that the developers have programmed.

The other method is to simply write to new boards altogether.  Some creative individuals have managed to create their own tools and reproduction circuit boards for those who home-brew their own NES games.  I plan on testing this method in the future, purchasing boards and proprietary programmers manufactured by Infinite NES Lives.

The majority of the instructions I followed were provided by The Poor Student Hobbyist.  He provides incredible detailed and easy-to-follow guides for the porting process.

Mappers and Donors


I did not conduct extensive research into the various mappers that can be used for NES games, but I figured that with how small my game currently stands, I could certainly get by with the standard NROM mapper, which was used on classic titles like Bomberman, Mario Bros., and Ice Climbers.  There are many dedicated users who have created full databases of cartridges and mappers, which makes the process of finding a suitable donor much simpler.  After a little research, I visited my local video game retail store and purchased used copies of Baseball and Tennis as my donors.  

After purchasing my donors, I took them to the laboratory to try to desolder them.  I attempted to take apart Baseball first, with little success...

Thank God I bought that second donor cart.

Programming the New Chips


As I learned the hard way, you cannot re-program the CHR and PRG chips that are already in your donor cartridge.  Turns out they are called Read Only Memory chips for a reason.  Once I had got this fact through my thick skull, I went to a local electronics store and picked up a few M27C512 EPROM chips, 1 to hold the PRG data and 1 for the CHR data.  This chip is much bigger than I needed, but I figured I could spare the funds to ensure I had a lot of space to work with.

Now, I kind of lucked out in regards to programming equipment.  The campus had a Chipmaster 6000 hidden away that was used as a universal programmer for EPROM and EEPROM chips.  You can see a few more details on this device on my previous post regarding my hardware setup.

The programmer.

Using the software for this programmer is fairly straight-forward.  In short, you check to ensure that the chip is empty (if not, you need to erase it using UV light), choose the local file that you wish to write to the chip, and burn it.  The software (as well as the indicator lights on the Chipmaster itself) will let you know whether or not there was any issue writing your chosen file to the chip.

Upon reviewing the instructions from the Poor Student Hobbyist, he talks about using the ReadNES3 program to split a ROM file into the PRG and CHR files that will be placed onto each chip.  I was unsure if I would have issues if I instead simply tried to burn the files I had already prepared onto the chips, but being that I was short on time, I went ahead and compiled those files into a ROM, and used ReadNES3 to separate them again.  I even went ahead and doubled the sizes of the separated CHR and PRG files, to ensure they took up the majority of the space on the EPROM chips.

Once all of these steps were said and done, it was time to try programming the chips.  To my amazement (and skepticism), the programmer completed each task without any errors on the first pass.


To ensure that this had worked, I needed to now solder the chips onto the donor board.  To ensure that there would be no damage done to the data, it is recommended that the window on the EPROM is covered with electrical tape, as this window's exposure to UV light sources would essentially erase any data on the chip.


And for the moment of truth...


It works!

Conclusion

The fact that I tried to cram so much information into these last two posts should demonstrate just how much time and effort goes into home-brew games.  I can't help but look at games like Battle Kid and be impressed by the developer.  Truthfully, this was a fascinating experience, and I'm glad that I was able to use it as my senior project before graduation.

I had originally attempted this project due to my life-long love of video games;  I wanted to find a way to combine that passion with the field I had chosen to pursue in school.  What I ended up with, however, is a new hobby.  There is still a lot that I don't fully understand, but with graduation around the bend, I want to continue learning until I can build the game that I am proud of.  This blog was originally intended to share my learning experience, and I am to continue to do just that.

-JWest

Wednesday, January 18, 2017

NESDev - End of Semester Sprint (Pt. 1)

I'm pretty late for this update, but it needs to be written.  The ultimate goal for Cloak n' Dagger (did I mention that was the name of the game?) was to have a working game by the end of the fall semester.  Originally I had aimed to have a full working game at the time of presentation; however, the design of the game got smaller and smaller, and I ran so low on time that I eventually decided "If I have two characters on a screen that move and jump, I'll be good".

Thankfully, I was right.  Ultimately, my project was well received among my classmates as well as my professor, even though my project had less hardware involved that the other projects (an L.E.D. voice-controlled chessboard, laser harp, and a smart mirror, to name a few...).

This blog is going to touch on the last week of the semester.  It will cover my process for porting the game onto a cartridge, some of the issues I ran into a long the way, and where the project currently is.

The Final Week


It was difficult to manage my time during the final sprint, as I had final exams for 4 additional courses to study for.  As previously mentioned, I had to change my goal for a final product; this meant taking focus away from certain issues and turning to new ones.

In the last post, I mentioned that I was trying to implement the GPU's mirroring feature in order to force a sprite to "turn" and face the direction they were moving.  I eventually decided to forgo that feature altogether, and moved my focus to adding a second player, jumping, and collision.  If I had the time, I would go so far as to add background tiles and change up the color palette from the "black and blue" that I had been using from the Nerdy Nights tutorials.

Player 2

Adding Player 2 was relatively easy.  I opted to simply copy/paste/modify the code for player 1, accounting for a change in sprites and change in controller port.  This simply meant using LDA $4017 instead of  LDA $4016 where necessary, and adding onto the sprite loop to account for "Dagger" (yeah, the characters have names now too).

LoadSprites:
LDX #$00              
LoadSpritesLoop:
LDA sprites, x        
STA $0200, x          
INX                   
CPX #$60   ; Compare X to hex $60, decimal 96 (overshooting)
BNE LoadSpritesLoop

Here, I think I overshot the upper limit of sprite tile addresses quite a bit (trying to recall why...).  Essentially, I only aimed to use two characters, but that meant 12 sprites overall.  


sprites:
  ;     vert tile attr horiz
  ; Y - TILE - ATTR - X
;----------------- Cloak Sprites -----------------
  .db $80, $00, $00, $40   ;headleft $0200 - $0203
  .db $80, $01, $00, $48   ;headright $0204 - $0207
  .db $88, $10, $00, $40   ;spine $0208 - $020B
  .db $88, $11, $00, $48   ;front $020C - $020F
  .db $90, $20, $00, $40 ;back leg $0210 - $0213
  .db $90, $21, $00, $48   ;front leg $0214 - $0217
;----------------- Dagger Sprites ----------------
  .db $80, $44, $00, $B0   ;headleft $0218 - $021B
  .db $80, $45, $00, $B8   ;headright $021C - $021F
  .db $88, $54, $00, $B0   ;front $0220 - $0223
  .db $88, $55, $00, $B8   ;spine $0224 - $0227
  .db $90, $64, $00, $B0   ;front leg $0228 - $022B
  .db $90, $65, $00, $B8   ;back leg $022C - $022F

Documentation is immensely important for this project.

For those who may be wondering, the "tile" address (column 2 in the above tables) simply lines up to the position of the tile when drawn in YY-CHR.  The software makes it easy to keep track of where each tile has been placed in memory.


Jumping

Oh boy.

I initially thought that jumping would be fairly straight-forward.  I've figured out how to make a group of pixels move left and right at the same time, all I have to do is make them move up and down, right?

beam_gif


Turns out there were a few obvious points I didn't think about:
  • What goes up is supposed to come down.
  • You're not supposed to continuously jump in mid-air.
Both of these issues where fairly simple to solve, though my solutions were fairly buggy.  There is a lot of code and a bit of a confusing road-map that I will need to explain, so bear with me for a moment.

;--------------------------  P1 Read A ---------------------------
LDA $4016
AND #000001  
BNE A1Fix
JMP ReadADone1  
A1Fix:
NOP

FloorCheck1:
LDA $0200
CMP #$80
BEQ APressed1
JMP ReadADone1
RTS

APressed1:
LDA #$00FF
STA DelayRegister
Jump1:
; ;;;;;;;;;; HEAD LEFT ;;;;;;;;;;
LDA $0200       ; load sprite X position
CLC
SBC #$02  
STA $0200 ; Save Sprite 1 X position
; ;;;;;;;;;;;;;;;;;;;;;;;;;;;;;;;;;;;

------Insert Recycled code for the rest of the sprites here...------

vblankjumping:
BIT $2002
BPL vblankjumping
LDA $0200
CMP #$32
BNE Jump1
BEQ FallDown


FallDown:
LDA #$00FF
STA DelayRegister

Fall1:
; ;;;;;;;;;; HEAD LEFT ;;;;;;;;;;
LDA $0200       ; load sprite X position
SEC  
ADC #$02  
STA $0200 ; Save Sprite 1 X position
; ;;;;;;;;;;;;;;;;;;;;;;;;;;;;;;;;;;;

------Insert Recycled code for the rest of the sprites here...------

Needless to say, jumping took up a lot of my time during finals week.  There were several bumps I hit at this point that required additional research, but before I get into those, let me see if I can simplify the order in which this code is run.
  1. Check $4016 to see if A has been pressed.
    • If A has been pressed, jump to "A1Fix".
    • If A has not been pressed, move on to check if 'B' has been pressed ("ReadADone1").
  2. After jumping to "A1Fix" (to be explained), check if the character is touching the floor.
    • If the character is touching the floor, continue on to "APressed1".
    • If the character is not touching the floor, move on to check if 'B' has been pressed (ReadADone1).
  3. APressed1 will load FF into a register set aside for a delay.  The code then moves on to the actual "Jump".
  4. "Jump1" systematically moves all of the character's sprites up 2 pixels.
  5. The game waits for a VBlank, then compares the position of a sprite to a "ceiling".'
    • If the sprite has not hit the ceiling ($32, in this case) then the game loops back to "Jump1".
    • If the sprite has hit the ceiling, then the character falls, which is our "Jump1" in reverse.

"A1Fix"

This part of the jumping routine was used to fix an issue (Branch address out of range!) I was having when assembling the code.  It isn't an issue with the assembler, but a limitation with the processor.  As explained by users tokumaru and koitsu in this forum post, if the code is expected to "branch" to a subroutine that is rather far away, the processor will throw the above error.  However, we can use this trick of using the JMP command to branch rather than and actual branch statement to avoid the error.

This is simply a result of limitation differences between the two commands.  Any of the branch commands, such as BNE or BEQ consist of 2 bytes: 1 for the opcode itself and 1 byte for the operand.  The operand leaves availability for a signed 8-bit number, which means that the branch command is limited to travelling 127 bytes forward or backward from its location.

The JMP command, on the other hand, reserves 1 byte for the opcode and 2 bytes for an address to jump to.  As koitsu points out, a pretty important distinction here is that the JMP command observes an "absolute address" as the command argument, while a branch command will use a relative address for it's operand.  The relative address is often considered an offset from the opcode using it, which in this case will be very limited.  As the JMP command uses absolute addresses, the command is fully intended to jump anywhere in the processor's memory.  In this case, the JMP command can travel anywhere from $0000 to $FFFF.

In short, rather than checking to see if A has not been pressed (as we have done with all button presses), we check to see if it has been pressed pressed.  This allows use to use the branch command within it's limitations, while the branch is simply 2 lines away.  When the branch command finds that the button has not been pressed, it simply continues onto the next line, which utilizes the much winder address range of the JMP command.

That was a longer explanation than I intended.

VBlank


The concept of the V-Blank state is something that I really should have tried harder to understand when I started out on this project, as it would have made programming jumps much easier (or any vertical movement, for that matter).  

Originally, I had realized that when I programmed jumping into the game, it might have been happening so fast that it wasn't visible to the human eye.  That is why, in the code above, you see remnants of me trying to apply a "delay" subroutine.  I assumed that by applying a delay that decremented the value in an address from a very high number, I could slow down the jump to be more visible.  This is the closest I could get...


It turns out, the highest value I was able to apply to my delay subroutine to count down from was $00FF, for the exact same reasons that I needed to apply "A1Fix".  The branching instruction I was trying to apply simply couldn't handle a higher value.

Thankfully, the nesdev forum users once again came to my rescue.  In user 9258's post, he discovered that he could only create a functioning jump by applying a small subroutine that waits for the V-Blank state.  The V-Blank state is a period of time in which the PPU is in-between drawing sprites onto the TV screen.  As you might remember, television sets during this time would use a "gun" that travels left to right, from the bottom to the top of the screen.  Relying on the period in which the screen would be refreshing this cycle is the best method for creating vertical moving sprites in a smooth and effective manner.


While I ended up with a jump I'm happy with, the user response to the forum post goes into much finer details about how to build a basic jump.  Fine tuning the jump is on my to-do list, as well as fixing up a lot of the other flawed methods I applied to making this game functional.


Collision

Another fun one.

Figuring out collision took a lot of research and a lot of thought, and I'm still pretty sure I'm doing it wrong.  I eventually came across this article, which addresses the fundamentals of collisions among multiple sprites.  I am planning on revisiting it and actually trying to apply the mathematical logic behind it, as at the time of implementing collision, my head was pretty weighed down with the stress of finals.  Eventually, I settled for simply establishing collision between the front sides of each character, narrowing down the number of tiles and directions that would need to be accounted for.

I decided to take a similar approach to my jumping logic, where I control sprite movement based on sprite location.  In this case, the code would compare the positions of the sprites of player 1 to the sprites of player 2, and if there was overlap, all sprites would be pushed backwards.


;--------------------- Collision Checks -------------------

CFace2DFaceX:
LDA $0207
CMP $021B
BCS CFace2DFaceY
JMP NoCollision
CFace2DFaceY:
LDA $0204
CMP $0218
BEQ CFace2DBackX
JMP NoCollision
CFace2DBackX:
LDA $0207
CMP $021F
BCC Cloak_CollisionFront

Cloak_NoCollision:
DFace2CFaceX:
LDA $021B
CMP $0207
BCS DFace2CFaceY
JMP NoCollision
DFace2CFaceY:
LDA $0218
CMP $0204
BEQ DFace2CBackX
JMP NoCollision
DFace2CBackX:
LDA $021F
CMP $0207
BCC Dagger_CollisionFront
NoCollision:
  
  RTI             ; return from interrupt

As I tested this concept more and more, the above code was the first working result I could produce.  Unfortunately, i do not have any record as to why the overlap of sprites was required (again, collision is something that will be fine-tuned with jumping), but as you may be able to follow, these subroutines check to see that one set of sprites has overlapped the sprites of the other player, then only forces the sprites away from each other when reaching the "back" set of sprites of the other player.  If those conditions are met, another set of subroutines are called, which simply move the sprites in the intended direction:

Cloak_CollisionFront:
LDA $021B
CLC
SBC #$04
STA $0207
LDA $0223
CLC
SBC #$04
STA $020F
LDA $022B
CLC
SBC #$04
STA $0217
LDA $0207
CLC
SBC #$07
STA $0203
LDA $020F
CLC
SBC #$07
STA $020B
LDA $0217
CLC
SBC #$07
STA $0213

RTS

Overall, this was the result I settled on before moving on to the hardware implementation of the project:

collision_gif.gif

This blog post has kind of worn me out.  As I begin to tinker with Cloak n' Dagger again, I will probably go through this post (and previous ones) to add info or fix mistakes.  For now, I'm moving on to the next post, which will discuss the process of porting my prototype to a cartridge.

Cheers,
-JWest