Wednesday, August 27, 2014

The Grind

Well, as of 168 hours ago, the Fall semester at New Mexico State University is underway.

As of now,  I have a weekly schedule that consists of ~20 hours spent at work cleaning storage units, ~19 hours spent on campus, and ~7 legitimate hours of free time.  As you can probably see, these projects are going to slow to a crawl.

On a more positive note, I'll review a few awesome things that have happened with the development of "Depth".  My wife, Rebekah, has officially hopped on the development team and is heading up the art direction of the game.  She's having a blast shooting back ideas back and forth across the living room, and I'm really glad she can share in the joy of this creative process.

I've also ironed out quite a few major bugs.  Now, if the player would "focus" while in the middle of an out of focus block, they will simply drop below it.


It's a small change, but the aim was to force the player to do their best to land on top of the block.  Plus, I'm also very proud because it's the first instance of GML code I tested that worked on the first pass.  Awesome.

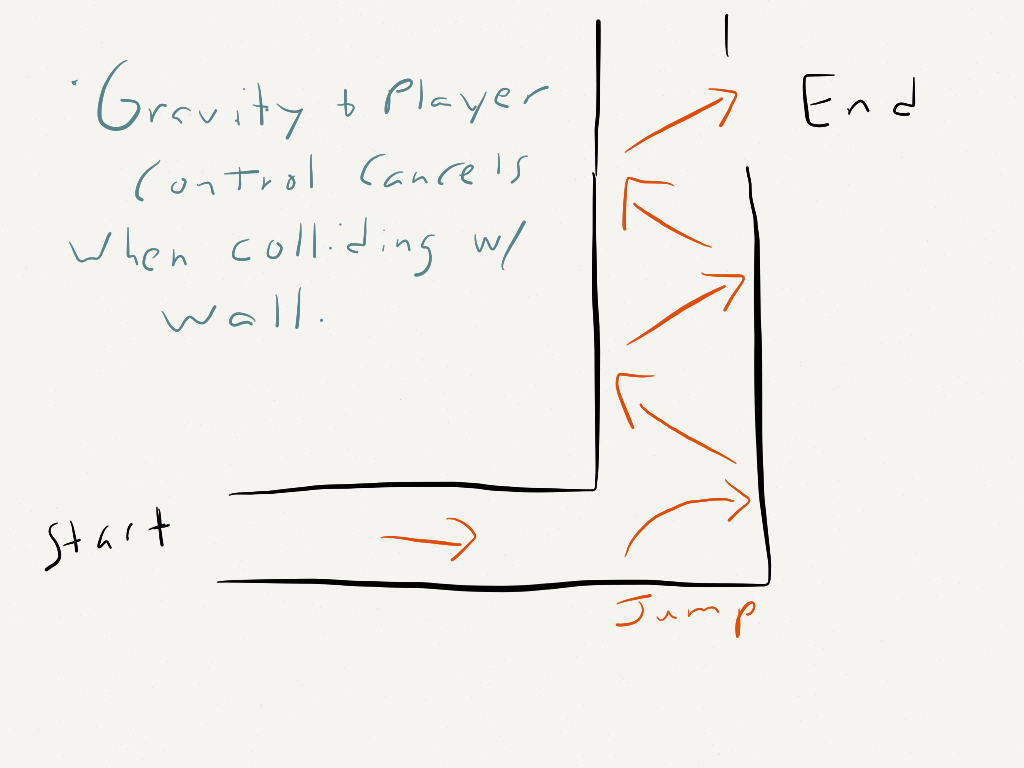
As I did mention in the past as well, I wanted to start toying with level design.  And I have been.  I've been keeping all sorts of sketches for creative ways to apply this whole "focus" concept into level design. Although, as much as I like how they are turning out, I do feel like a lot will involve pure in-engine experimentation to see what really works.

So that's about it.  There isn't much to this post, it's just an update and a little reminder to myself to keep going.  I need to remember to make time for this stuff, and not just sink into my couch at the end of the day.

Hopefully I'll get to share some of the creative process in the future, like my level sketches or my wife's pixel art.  We'll see where we go.

Here's to a good Fall season.
-JWest

Thursday, August 21, 2014

"Depth" - Showing Appreciation for the Drag and Drop

The "focus mechanic proved to be much simpler than I thought.  GameMaker Studio has a handy function in it's Drag and Drop U.I. simply titled "Change Instance".

The "Change Instance" function was all I needed to make this mechanic really work.  Using similar platforming control code I've used in past tutorials,  all I needed to do was create a blurred version of the sprite used for the object that the player would be colliding with.  As the "blurred block" isn't mentioned anywhere in the player object code, the player simply doesn't react with it.

I've tied the "Change Instance" action to a key release event, in this case, the letter "Q".  So, once a player presses and releases the Q key, that causes the instance of the blocks to switch.


Now, the problem I am running into is my own lack of coding experience.  As you can see in the above .gif, all of the block I have used are, well, blocks.  There is no "floor" for the player to land on, as once the "focus" key is hit, ALL of the other blocks would go out of focus.

Now I have tried to add a floor object and tie it into the players collision code, but so far, this has been the result:


I sort of though it would be as simple as adding an "or" statement:

if (place_meeting(x+hsp, y, obj_block or obj_floor))
{
    while (!place_meeting(x+sign(hsp), y, obj_block))
    {
        x += sign(hsp);
    }
}
x += hsp;

But that proved to be incorrect, as the player would simply fall through the floor.

Once again, GameMaker's Drag and Drop U.I. has come to the rescue.  I finally figured out that all I needed to do was add a collision event to the player object with the instance of the floor.  Applying that same code this time to the floor object, the only issue I had bumped into was that the player would get stuck in the floor if he/she fell through one of the "blurred" blocks.  This time, I was able to fix it using that same script that was used in the tutorial for "Breakout":

while (place_meeting(x, y, argument0))
{
x += lengthdir_x(1, argument1);
y += lengthdir_y(1, argument1);

}

This keeps the player pushed above the instance of the floor and allows the player to control the character normally.

**On a side note, I'm taking note of the functions used in this script as well as my coding issue with floor collision.  Expect another one of them "Lesson Learned" posts in the future.

I think it is safe to say I have a nice stepping stone for this project.  It may not seem like much to most of you, but I can't explain how exciting it is to actually make progress on something.  Now, I have a lot I still need to learn.  I would very much like to get to a point where I can rely strictly on code and not the drag and drop, but it does really help to push you along if you get stuck.


The nest step I think will require a little more research/tutorials.  What I hope to look at next are:

  1. Creating a finishing line.
  2. Creating a health system/objects that harm or hinder the player.
  3. Overall level design.
So to get an idea of whats coming up for the blog, I will more than likely have a couple of "Lesson Learned" posts as I review some code and dive into a few tutorials relevant to these projects.  Heck maybe I'll even throw in a few Rant/Opinion posts when I have the time...


-JWest

Tuesday, August 19, 2014

Palette Cleanser: Starting a Secondary Project

I think the title says it all.

For the past few days, I've been throwing code at the wall trying to make sense of the physics needed for "Off the Wall" to work.  It's getting kind of monotonous.

I'm not giving up on the game,  I just feel I need to refresh the creative juices.  So, I'm going to get started on another concept I had been planning well before "Off the Wall" popped into my head: "Depth".

See, one of my hobbies for the past few years has been photography.  One of the things that I liked to think about is the focus of objects in a photograph related to the depth of field.  I was trying to figure ways to implement that into a game, at least, a game I knew my entry-level smarts would be able to program with GameMaker.

And so, depth was born.  I had spent a bit of time sketching out mechanics, objects, enemies and the like onto paper:


The basic concept of the game is that it is, at heart, a platformer.  The only main difference will be a "focus" mechanic.  Imagine if we had re-done the original Super Mario, only we added layers.  One layer in front of the main level, and a layer behind.  You would see various blocks and objects that are out of focus and may be different sizes depending on the plane they reside in.  However, the only way you would be able to interact with these objects is by turning your focus away from whats in front of you to whatever is in either the front or back plane.  If you think about it from Mario's perspective,  it would be as if he is looking left and right as opposed to the blocks and Goombas directly in front of him.

Now, I've had a few different ideas of how to apply this mechanic to make a game actually fun:

  1. Timed Runs:  Get to the finish point before the avalanche behind you catches up.  In other words, it imposes a threat that you need to get through each stage as fast as possible and be able to "focus" on the fly.  This could result in the challenge being: identify the proper path of blocks/objects to get you through the course (be it over a gap or over a mountain or something such).
  2. ...actually, now that I have written out the other ideas and deleted them, I don't think they're really worth following up with the first idea.
So, for the time being, it looks like the game will revolve around timed runs.

Since I'm getting the basic code of platforming down, it seems the only really new venture is the mechanic, which I'll imagine will just involve switching from an object without collision to an object with collision and having the corresponding sprites (probably just throw em into gimp and add a gaussian blur...).

So that is the new project.  I'm not giving up on "Off the Wall", merely taking a creative break and refreshing my head.  I'm hoping that a little time away will help me to better figure out the physics code I'm aiming to have for the game.

-JWest

Wednesday, August 13, 2014

"Off the Wall" - Session 2

My apologies for my last blog post, I was rather impatient.  More or less, I was just slapping code wherever I felt it might do something.

I gave "Off the Wall" a bit more thought today, and finally made a final decision as to what the game is going to be:

Granted, this is what the first level might look like.

The concept I'm going after crosses Pinball with your every-day platforming game.  The idea is that when the player jumps into a wall, they will ricochet off, traveling at a constant speed until the next wall-bounce, where their speed will increase.  While bouncing through the air, the player will have no control.  Control will only be given back to the player once their character's feet have touched flat ground again.

As you can see, all I have really done here is mash together the two primary concepts from my last two lessons.

Now, being an entry level programmer...


I can't say programming physics is something I'm used to.

But I have made progress!  Upon colliding with an instance of the wall, the player bounces and loses the hold of gravity.  And, if the player can make it back down...


Gravity and regular player control are restored!

At this point, there are 2 existing factors I need to be rid of:
  1. Bouncing physics just doesn't make much sense.  The banana just continuously travels upwards with every bounce.
  2. The player still has control of the banana while in mid bounce.  Where's the fun in that.
One last point I wish to add:  Chaos.

The biggest thing I want in this game is the possibility for things to just go out of whack.  As I mentioned above, I'd like to get to a point where speed constantly increases with every bounce the player makes.  If they plan their path well enough, they'll make it to the finish no problem.  But if not, the player will be praying for flat land.

To sum up, we're making progress.  It is taking a lot of trial and error on my part, but by taking stabs in the dark, I'm learning how these objects can interact, and I'm taking the time to learn why some things work and others don't.

Once I get the final pieces of the basic gameplay together, I will share the code I've come up with and re-iterate what's going down.

-JWest

Tuesday, August 12, 2014

"Off the Wall" - My First Pass at a Game

As I mentioned in my last post, its time to take a break from tutorials and take a stab at application.  That is what "Off the Wall" will be.  I'll just be observing the code I used in my platforming and "Brick" lessons, to make a platformer where physics doesn't make a whole lot of sense.

I need to learn how to think like a programmer.

What I had attempted to do on my first attempt was just look at my collision code for the player and replace any horizontal collisions with the "move_bounce_all" function I had learned about when coding "Breakout".  As you can probably guess, that only went so far.  I ended up leaving all of the original code from my "Controls of Platforming" lesson and just added a new object with a collision event for the player.

EDIT:  Just to be clear, this is what I'm trying to replicate:

(Battleblock Theater)

So far, we've made progress.  The player does bounce when colliding with this specific block, however the direction is fairly random and the player falls through any other surfaces after bouncing.


Now, I'll be honest, I got lazy.  I copied and pasted code from Breakout and slapped it onto the green block you see in the .gif.  I was mainly focused on making sure that the player would actually collide with the instance.

Now that we know this is at least possible, I can look into fine tuning that "bounce" code.

I can already tell you I need to review this concept a little more... or perhaps some trial and error is necessary...


I'll post what I find out when I get there.

-JWest

(P.S.  Now that I've figured out how to make screencap .gifs, I'll post them a lot more.)

Thursday, August 7, 2014

Lesson Learned: A Bit More On Collision

DISCLAIMER:  While I work on developing my first games, I will be making "Lesson Learned" posts.  All this post will be is me explaining code, so that I myself will better understand what I am learning.

As I mentioned in my previous post, I'm going to spend some time on GameMaker's tutorial of "Break Out", which focuses on teaching the coding language of GameMaker as opposed to their Drag and Drop system.  Since applying code will be so much more useful in making my platformer,  this tutorial will be pretty important in this learning experience.

Right off the bat, the tutorial asks you to make some changes to the "Collision Mask" of the sprite we will use for the ball in the game.  Opening up the collision mask properties gives us a few interesting options, but what we are primarily focusing on is the shape of the mask.  All this really does is give you an area of pixels that define at what points the sprite will be considered "colliding" with other sprites.  You are given 4 options, "precise", "rectangle", "ellipse", and "diamond".  Since we are supposed to be using an actual ball for this sprite, the tutorial recommends using the ellipse.  However, for whatever reason I opted to use a sprite of Bowser, I'll apply the "precise" collision mask and see what happens.

Next, we're building the collision for the "bat" object, the bar that the player controls to deflect the ball against the bricks.  There is some familiar code that is applied to he object when the left arrow key is pressed:

if place_meeting(x-5,y,obj_wall) == false
{
x -= 5;
}

Here we see the "place_meeting" applied again.  Now, by my understanding,  what is going on here is that the code observes the x coordinate of the bat.  The actual speed of the bat will probably end up being 5, so it observes the pixel space to the left of the object 5 pixels at a time.  As long as there is no wall object within those 5 pixels (indicated by the "== false" condition), then the object will move to the left another 5 pixels (where x -=5 comes into play, remember that the plane starts in the top left corner in the room at (0,0), so moving to the left of the plane means a negative x value).

The exact same thing is done with the right arrow key, only some values are flipped to imply traveling in a positive direction of the plane:

if place_meeting(x+5,y,obj_wall) == false
{
x += 5;

}

Now I've sort of skipped ahead at this point, as this post is mainly focusing on collision.  After applying some code concerning the creation and movement of the ball object itself, we get into creating collision events for the ball.

First is collision with our invisible wall, which only uses a single line of code:

move_bounce_all(true);

It seems that GameMaker has its own built in physics for bouncing.  Apparently, this sets the ball to have "precise" collision with the wall.  I'm not sure how this works, how to change it, or what it truly does, but if I figure it out, I will update this little blurb of the post.

Next we create a collision instance for the ball with the brick object:

move_bounce_all(true);

with (other) instance_destroy();

This does the same exact thing as the collision with the wall, however now the ball will destroy whatever it collides with(excluding the wall, yet INCLUDING THE BAT, we'll fix that in a moment).

Now for the collision with our player controlled bat:

move_bounce_all(true);
var dir;
dir = point_direction(other.x, other.y, x, y);
motion_add(dir, 5);

speed = 5;

Now... this is going to take some going over.  We have our familiar first line of code, however, everything that follows focuses on the position of the bat and how it will affect the direction of the bounce of the ball.  What the function "point_direction" does is establish a vector (if you recall from Physics 101) relative between the direction the ball is currently travelling (with its x and y coordinates) and the position of the bat (the bat represented by other.x and other.y).  Once that angle is set, the direction and speed is actually set, as in the ball will start moving at the angle we established, with the "motion_add" function at a speed of 5.  Since motion_add affects the speed of the ball relatively, we had to set the speed again in the last line to ensure the ball bounces back at the same speed.

I guess this technically doesn't concern the concept of collision itself, but it is still a necessary thing to understand for future projects.

Now, at this point, I have a functioning game of breakout.  The next couple of bits of tutorial cover primarily general game play elements, such as lives and score keeping.  While I'll code these into the game, I wont go over those concepts too much in this post.

The final bit I will cover, however, fine tunes and smooths out the physics we have already established.  As the game plays now, it's functional, but it has bugs.  For example, the ball (or in my case Bowser), can get stuck in the bat if it is hit at just the right angle:


With this in mind, GameMaker introduces Scripts.   First, we are creating the following function, which we will apply to all other objects in case Bowser manages to get stuck elsewhere:
while (place_meeting(x, y, argument0))
{
x += lengthdir_x(1, argument1);
y += lengthdir_y(1, argument1);

}

This script observes the object that is being collided into and will scoot the instance along 1 pixel at a time until it senses that there is no collision with the object.  The direction the object will then travel is passed in as an argument (into argument 1).  We apply this to the ball object in every collision event.

To further understand exactly what is going on in this script, I had to dive further into the manual.  The biggest tool in this script is the "lengthdir" function.  The first argument is "len" or the length away from the origin of your object, and argument1 is the direction in which you are pointing that pixel.  Added onto the current x and y coordinates, the object moves relatively.

First we apply this in collision with obj_wall:

var dir;
dir = direction - 180;
scr_move_out(other, dir);

move_bounce_all(true);

As you can see, the direction (argument1 in our new script) is set to be our current angle -180.  In the next line, we pass argument0 as other (indicating the object being collided into) and argument1 as the direction.  The length is already set to 1 pixel, so in case Bowser gets trapped in the wall object, the script will now search 1 pixel at a time until it finds an escape.  This is all added above our already set "precise bounce" function.

Similar code is added to the other collision objects as well, like the Bat:

var dir;
dir = point_direction(other.x, other.y, x, y);
scr_move_out(other, dir);
move_bounce_all(true);
motion_add(dir, 5);

speed = 5;

And the Bricks:

var dir;
dir = point_direction(other.x, other.y, x, y);
scr_move_out(other, dir);
move_bounce_all(true);
with (other) instance_destroy();

Upon pressing F5, I find that Bowser no longer becomes ensnared in that skinny prison of Goldenrod.

With that, I must get ready for my day job.  Next post I'll take a break from learning and apply what I've learned so far into a platformer.

-JWest

Tuesday, August 5, 2014

Lesson Learned: The Controls of Platforming

DISCLAIMER:  While I work on developing my first games, I will be making "Lesson Learned" posts.  All this post will be is me explaining code, so that I myself will better understand what I am learning.

I've been playing around with the tutorials for Game Maker and so far have covered the basics of the GUI as well as its Drag and Drop system of Programming.  However I decided the fist game I want to take a stab at is a platformer.  And the code is... well, new to me.

It appears to make a good platformer, you simply cant apply the drag and drop system.  You want to have control over all of the physics that go into the game.  Below is the code required to control keyboard inputs, collision, as well as gravity, all of which were applied to the object of the character.

///Initialize Variables
grav = 0.2;
hsp = 0;
vsp = 0;
jumpspeed = 7;
movespeed = 4;

The few lines of code above are applied to a "Create" event to the character object (as in, this code pops up when the object appears on the screen).

What these do is simply establish variables.  We set a value of 0.2 for the variable "grav", which will naturally represent gravity.  This variable will intertwine with our vertical speed variable ("vsp").  Naturally, as we dont want our character to be moving as the game starts, we are setting our vertical and horizontal speed to be zero, represented by "hsp" and "vsp".  The jumpspeed and movespeed variables are pretty self explanatory.  All of the variables we have established here will come into play with the next bit of code, which has been placed into a "step" event.  That is, every frame of the game will be checking this code.


Here is where the action takes place:

///Inputs
key_right = keyboard_check(vk_right);
key_left = -keyboard_check(vk_left);
key_jump = keyboard_check_pressed(vk_space);

//React to inputs
move = key_left + key_right;
//the above works as math. will equal zero when niether is being pressed
hsp = move * movespeed;
if (vsp < 10) vsp += grav;

if (place_meeting(x,y+1,obj_block))
{
    vsp = key_jump * -jumpspeed
}

//Horizontal Collision
if (place_meeting(x+hsp,y,obj_block))
{
    while(!place_meeting(x+sign(hsp),y,obj_block))
    {
        x += sign(hsp);
    }
    hsp = 0;

}
x += hsp;

//Vertical Collision
if (place_meeting(x,y+vsp,obj_block))
{
    while(!place_meeting(x,y+sign(vsp),obj_block))
    {
        y += sign(vsp);
    }
    vsp = 0;

}

y += vsp;


Now, this is where I'm having some trouble, so bear with me as I try my best to explain this bit of code in relation to the variables we had set before, and in relation to what will be going on in the game itself.

First off, we are setting a few new variables.  As it states at the top of the code, this is all taking the input of the player and applying it to our values that we have set.

key_right = keyboard_check(vk_right);
key_left = -keyboard_check(vk_left);
key_jump = keyboard_check_pressed(vk_space);

You can probably figure out what this is by just looking at it.  We are now assigning new variables to physical key presses.  So, whenever the right or left arrow key is pressed, it assigns a number 1 to the assigned variable, making it "true".  The reason we have assigned a negative value to the left key check will come into play further down the code.

move = key_left + key_right;
hsp = move * movespeed;

The above code is where these 1's and 0's get placed from the "keyboard_check"s.  As it is written, if key left is pressed, key_left becomes a 1, and if key right is pressed, key_right becomes a 1 as well.  This is why we made the Keyboard_check for the left key a negative value.  when -1+1 = 0, therefore if both keys are pressed, the move variable becomes false.  The character will not move.

The next line down, concerning the variable "hsp", observes the outcome of the addition we made and multiplies it by the movement speed of the character.  Again, if both keys are press, or no keys are pressed, the outcome is zero, and zero multiplied by 4 is still zero.

if (vsp < 10) vsp += grav;

This line applies our value for the gravity constant to our vertical speed.  In other words, if the vertical speed of the character becomes less than 10 (i.e. slowing down at the top of a jump), gravity kicks in, and the character will fall at the rate of gravity added onto the vertical speed (which we had set to 0.2).

if (place_meeting(x,y+1,obj_block))
{
    vsp = key_jump * -jumpspeed
}

This bit confused me at first, but its just an exercise in our boolean logic.  All this bit of code is doing is allowing the player to jump.  First, we need to remember that the "rooms" in GameMaker start with the origin of 0,0 in the top left corner.  Traveling down the screen or to the right of the screen results in positive x and y coordinates.  So, the place_meeting function observes which object your character is in contact with and where in relation to the character object.  In this case, we look at "y+1" being one pixel BELOW the character object, and it is coming in contact with the "wall" object I made, called "obj_block".

If that meeting place is true, that is, if the chaaracter is in fact sitting on top of a wall, then we allow the vertical speed to equal the inverse value of the jump speed (since we are jumping UP, our y value becomes a negative value), multiplied by the value 1 that is presented when the space key is pressed (using the earlier keyboard_check).  **Note:  For the space key, we had to use keyboard_check_pressed to ensure the jump key was not pressed the frame before the instance of the key press, ensuring the precision of timing.

//Horizontal Collision
if (place_meeting(x+hsp,y,obj_block))
{
    while(!place_meeting(x+sign(hsp),y,obj_block))
    {
        x += sign(hsp);
    }
    hsp = 0;

}

x += hsp;


Our final bit of code here is without a doubt the most important to every platforming game.  This establishes collision between the character and our wall.  So again, we observe the place_meeting function to see where the block lies horizontally to the character.  The expression "x+hsp" observes the pixels ahead of the x coordinate (which would be 4 pixels ahead).  If the block is within those 4 pixels, we enter our while loop.  The ! that has been placed in front of the place_meeting function negates the outcome, so in other words, this while loop will continue to carry as long as there is NOT an obj_block within 1 pixel to the right or to the left.  That's where the parameter "x+sign(hsp)" comes into play, as it observes whether hsp is +1 when travelling to the right, or -1 when travelling to the left, thus accounting for both sides of the character.  

As long as that remains true, that there is no block within a pixel of the character, then "x += sign(hsp)" will carry out, which just allows the character to move a pixel at a time.  Once that rule of the while loop is broken, we execute "hsp = 0", which just stops the character altogether.

Once the collision rule is set, its safe to run the variable x, allowing the character to move.

The last bit of code is the exact same for the horizontal collision, just negated to apply to vertical values we established beforehand.

So, after completing this lesson, I have my first result:


Obviously, GameMaker code needs some more exploring.  There is a tutorial for building a game of "Breakout" I will likely tackle next to better understand how to control and fine tune all of the physics and controls that go into these games.


My first full game will no doubt be a platform game.  I have some ideas hashed out but more will come when I can actually begin to build it.

Cheers.


Monday, August 4, 2014

2.0

Ok, we're going to try this one more time.

I find it difficult to post my coding experiences, since I'm mainly doing lessons and I quite frankly don't have much to talk about.  But I've been playing around with something new.

Game Design.

Using Game Maker Studio, I've started, well, making games.  Games about my life and interests to be precise.  It probably sounds dull from your perspective, but its helped me to cope with a lot of the stress and turmoil I've been experiencing with my time out here.

I think my new goal will be to share the progress of these games, include some statements behind them.

This might be the most therapeutic thing I could have ever done.